Showing posts with label Social Share Button. Show all posts

Friday, April 25, 2014

// // Leave a Comment

Floating Social Media Widget for Blogger

After my previous articles about Css Animated Menu Widget for Blogger today i am going to share A beautiful and distinctive custom Widget for who have Blogs with limited space. Sensitive to touch the mouse, after automatically opens that touched a category.


So let's See The Tutorial How to add Floating Social Media Widget For Blogger 


LIVE DEMO


  • Go to Blogger Dashboard
  • Click on Drop & Down Menu of your blog
  • Click layout >> and click Add a Gadget >> Html/Javascript 
  • Then paste the below code on it

<style type="text/css">
ul#social {
    position: fixed;
    margin: 0px;
    padding: 0px;
    top: 20%;
    left: 0px;
    list-style: none;
    z-index:9999;
}
ul#social li {
    width: 100px;
}
ul#social li a {
    display: block;
    margin-left: -2px;
    width: 100px;
    height: 70px;  
    background-color:#fff;
    background-repeat:no-repeat;
    background-position:center center;
    border:1px solid #AFAFAF;
    -moz-border-radius:0px 10px 10px 0px;
    -webkit-border-bottom-right-radius: 10px;
    -webkit-border-top-right-radius: 10px;
    -khtml-border-bottom-right-radius: 10px;
    -khtml-border-top-right-radius: 10px;
    -moz-box-shadow: 0px 4px 3px #000;
    -webkit-box-shadow: 0px 4px 3px #000;
}
ul#social .twitter a{
     background:#0F96C6 url(https://blogger.googleusercontent.com/img/b/R29vZ2xl/AVvXsEitB_HFivOjRVHQxlu-iM-VywqahyphenhyphenyDv5zdykB-ij5V0ep1UmCNkw2oGPRJ2MJgiTi-bWw6k4hRSbMsnm2bZhwHBAZ53NNOJ4KrQc2efy_-csCNKm18ytrXdJN2_iW7WtlDDiu35wuyBPQ/s1600/Twitter.png)no-repeat;
background-position:center center;
}
ul#social .googleplus a      {
    background:#D73D27 url(https://blogger.googleusercontent.com/img/b/R29vZ2xl/AVvXsEiuHmCURbgaG0YYqlezwBksTEPrcVD9niozBkpRqsNV3zVorN2m7Cp6H8diQKNmbYHIjtsUfhGPMoyO3Cq7aUhAhSIu0QDMoQqmhvwJQHVy2Vyohl8jjAhrFyMz6SoGtJdtxswCLHzscNo/s1600/GOOGLE+PLus.png)no-repeat;
background-position:center center;
}
ul#social .facebook a      {
    background:#1A4B97 url(https://blogger.googleusercontent.com/img/b/R29vZ2xl/AVvXsEgx_Ox00f26MsY-B13LRF3lJnDEpe-OjesXmJkPgfH_hqXBpzzcqNpEZEdvLXoDNOucHqu3bCTUZ15b6vwX-lBfoTJsFIoZ1hym4OJ6la_UN7kA68cEBGOlsShVAzs43OLCfnAVsibiaGg/s1600/Facebook.png)no-repeat;
background-position:center center;
}
ul#social .rss a      {
    background:#FAAE17 url(https://blogger.googleusercontent.com/img/b/R29vZ2xl/AVvXsEij7T6LoCBthPxwKAuTwV_HqspOC1ZQ2RrOae9bukOFudA0tvZUjLQckjuphTXl7Mhb7TvT4b-M97Lene7rC_0I4VPLiyDiiNu_ECzxm3YHxPL0oUzJtYt1hoa3vaICkTff0hjDsIPEbXo/s1600/rss.png)no-repeat;
background-position:center center;
}

ul#social .pinterest a   {
    background:#963336 url(https://blogger.googleusercontent.com/img/b/R29vZ2xl/AVvXsEgLLRWH-OBdSnQnDxLeyva3wNIv8XZYY07fvw2qP20RLAvXCTmvWAZaNfRaJggu0PaKp06dDo09LrJKi5Maieer-pPNMu2r_J4PTcJ1RMwnsbX22PrJLjC3TBJHqC-sgoQgwQwUHYPXbow/s1600/Pinterest.png)no-repeat;
background-position:center center;
}
</style>

<script src="http://ajax.googleapis.com/ajax/libs/jquery/1.9.1/jquery.min.js"></script>

<script type="text/javascript">
$(function () {
    $('#social a').stop().animate({
        'marginLeft': '-85px'
    }, 1000);

    $('#social > li').hover(
        function () {
            $('a', $(this)).stop().animate({
                'marginLeft': '-2px'
            }, 200);
        },
        function () {
            $('a', $(this)).stop().animate({
                'marginLeft': '-85px'
            }, 200);
        }
    );
});
</script>
<br />
<ul id="social">
<li class="twitter"><a href="#" title="Twitter"></a></li>
<li class="googleplus"><a href="#" title="Google Plus"></a></li>
<li class="facebook"><a href="#" title="Facebook"></a></li>
<li class="rss"><a href="#" title="Rss"></a></li>
<li class="pinterest"><a href="#" title="Pinterest"></a></li>
</ul>


  • Save It. 
View your blog this widget will appear correctly if you facing some problem then leave a comment below.
Read More
// // Leave a Comment

Social Buttons With Hover Effect for Blogger

Give your readers a chance to show you how much you care about the Blog desing, or how good your article is, to raise the social media likes.

You may also read my previous article about Css Animated Menu Widget for Blogger.


Live Demo 


Just Follow These Simple Steps


  • Go to Blogger Dashboard
  • click on your blog drop & down menu
  • Click layout >> Add a gadget >> Html/Javascript
  • Then paste the following code in Html box

<style>
.social-contain {
 float: left;
 margin-bottom: 20px;
 text-align: center;
 width: auto;
 }

ul#social {
 position: relative;
 margin:0 auto;
 }

ul#social li {
 float: left;
 margin-right: 2px;
 list-style:none;
 }

ul#social li:last-child {
 margin-right: 0;
 }

ul#social li a {
 display: block;
 }

.soc-fb {
 background: url(https://blogger.googleusercontent.com/img/b/R29vZ2xl/AVvXsEi9piCKRx_NM8BYP22dnNnMfthnupzmQKoKEP5PcvQ5hFtw4GuSdw9MhspyXQrVq3W8K_M43T9TUP9i2hvTwW873ngnOlEjrCP63RYEPU7-4Cv0Nu2G8kedIZJSR8WsL1XrAzAgoad5pbc/s1600/social-but.png) 0 0;
 position: relative;
 width: 58px;
 height: 58px;
 }

.soc-fb:hover {
 background: url(https://blogger.googleusercontent.com/img/b/R29vZ2xl/AVvXsEi9piCKRx_NM8BYP22dnNnMfthnupzmQKoKEP5PcvQ5hFtw4GuSdw9MhspyXQrVq3W8K_M43T9TUP9i2hvTwW873ngnOlEjrCP63RYEPU7-4Cv0Nu2G8kedIZJSR8WsL1XrAzAgoad5pbc/s1600/social-but.png) 0 -58px;
 }

.soc-twi {
 background: url(https://blogger.googleusercontent.com/img/b/R29vZ2xl/AVvXsEi9piCKRx_NM8BYP22dnNnMfthnupzmQKoKEP5PcvQ5hFtw4GuSdw9MhspyXQrVq3W8K_M43T9TUP9i2hvTwW873ngnOlEjrCP63RYEPU7-4Cv0Nu2G8kedIZJSR8WsL1XrAzAgoad5pbc/s1600/social-but.png) -58px 0;
 position: relative;
 width: 58px;
 height: 58px;
 }

.soc-twi:hover {
 background: url(https://blogger.googleusercontent.com/img/b/R29vZ2xl/AVvXsEi9piCKRx_NM8BYP22dnNnMfthnupzmQKoKEP5PcvQ5hFtw4GuSdw9MhspyXQrVq3W8K_M43T9TUP9i2hvTwW873ngnOlEjrCP63RYEPU7-4Cv0Nu2G8kedIZJSR8WsL1XrAzAgoad5pbc/s1600/social-but.png) -58px -58px;
 }

.soc-gp {
 background: url(https://blogger.googleusercontent.com/img/b/R29vZ2xl/AVvXsEi9piCKRx_NM8BYP22dnNnMfthnupzmQKoKEP5PcvQ5hFtw4GuSdw9MhspyXQrVq3W8K_M43T9TUP9i2hvTwW873ngnOlEjrCP63RYEPU7-4Cv0Nu2G8kedIZJSR8WsL1XrAzAgoad5pbc/s1600/social-but.png) -116px 0;
 position: relative;
 width: 58px;
 height: 58px;
 }

.soc-gp:hover {
 background: url(https://blogger.googleusercontent.com/img/b/R29vZ2xl/AVvXsEi9piCKRx_NM8BYP22dnNnMfthnupzmQKoKEP5PcvQ5hFtw4GuSdw9MhspyXQrVq3W8K_M43T9TUP9i2hvTwW873ngnOlEjrCP63RYEPU7-4Cv0Nu2G8kedIZJSR8WsL1XrAzAgoad5pbc/s1600/social-but.png) -116px -58px;
 }

.soc-pin {
 background: url(https://blogger.googleusercontent.com/img/b/R29vZ2xl/AVvXsEi9piCKRx_NM8BYP22dnNnMfthnupzmQKoKEP5PcvQ5hFtw4GuSdw9MhspyXQrVq3W8K_M43T9TUP9i2hvTwW873ngnOlEjrCP63RYEPU7-4Cv0Nu2G8kedIZJSR8WsL1XrAzAgoad5pbc/s1600/social-but.png) -174px 0;
 position: relative;
 width: 58px;
 height: 58px;
 }

.soc-pin:hover {
 background: url(https://blogger.googleusercontent.com/img/b/R29vZ2xl/AVvXsEi9piCKRx_NM8BYP22dnNnMfthnupzmQKoKEP5PcvQ5hFtw4GuSdw9MhspyXQrVq3W8K_M43T9TUP9i2hvTwW873ngnOlEjrCP63RYEPU7-4Cv0Nu2G8kedIZJSR8WsL1XrAzAgoad5pbc/s1600/social-but.png) -174px -58px;
 }

.soc-rss {
 background: url(https://blogger.googleusercontent.com/img/b/R29vZ2xl/AVvXsEi9piCKRx_NM8BYP22dnNnMfthnupzmQKoKEP5PcvQ5hFtw4GuSdw9MhspyXQrVq3W8K_M43T9TUP9i2hvTwW873ngnOlEjrCP63RYEPU7-4Cv0Nu2G8kedIZJSR8WsL1XrAzAgoad5pbc/s1600/social-but.png) -232px 0;
 position: relative;
 width: 58px;
 height: 58px;
 }

.soc-rss:hover {
 background: url(https://blogger.googleusercontent.com/img/b/R29vZ2xl/AVvXsEi9piCKRx_NM8BYP22dnNnMfthnupzmQKoKEP5PcvQ5hFtw4GuSdw9MhspyXQrVq3W8K_M43T9TUP9i2hvTwW873ngnOlEjrCP63RYEPU7-4Cv0Nu2G8kedIZJSR8WsL1XrAzAgoad5pbc/s1600/social-but.png) -232px -58px;
 }
</style><br />
<br />
<div class="social-contain">
<ul id="social">
<li><a class="soc-fb" href="#" target="_blank"></a></li>
<li><a class="soc-twi" href="#" target="_blank"></a></li>
<li><a class="soc-gp" href="#" target="_blank"></a></li>
<li><a class="soc-pin" href="#" target="_blank"></a></li>
<li><a class="soc-rss" href="#"></a></li>
</ul>
</div>

  • Save It.
You have done if you need more info please let me know i will help you.
Read More

Tuesday, October 8, 2013

// // Leave a Comment

Add Facebook like button in every Blogger Post

Let your visitors like your content by adding Facebook Like Button to your post content. In this article I will teach you step by step on how to add Facebook Like Button below blogger blog post title with different button styles that suit to your content for example we have a standard, with box count, and with button count. We all know the importance of traffic for Rankings.
 
Wordpress has many built-in plug-in that enables this feature easily. But Google Blogger users have to do this manually by editing their blog's template. It is not a difficult task and if you know a little bit of HTML/XML then it takes a few minutes. You need to follow these steps in order to make it happen:


  • First of all, I recommend you to take backup of your current template so that you can avoid any loss.
  • For backup, go to your Blogger dashboard. Click on template and thenBackup/Restore on top-right side. Click on download full template and save it to your computer.
  • Now that you have taken the back up, it is time to choose a facebook button. Visit Facebook Developers page, it will show like the one below:
Add Facebook like button in every Blogger Post

  • Enter the Facebook page URL and customize your like button style.
  • If you don’t want the send button to appear with the like button, uncheck the send button from above form.
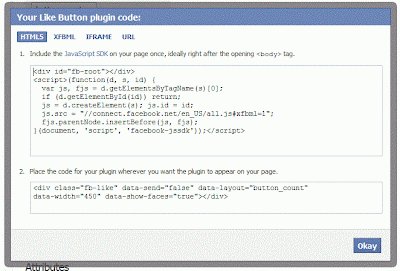
  • When you are done with the customization, you need to click on get code. It would pop-up a window like this one: 

  • Now copy the code shown above, it is the JavaScript code you need to put in the <body></body> tag. Press CTRL+F to find <body> and paste this code just below it.

Update: Those who are unable to find the body tag like <body>, they should try to find it like this <body>


  • Now copy the second code, if you want to put facebook like button at the end of every post you need to find this code first <data:post.body/>, if it is more than once try finding the last one.
  • Just after the last <data:post.body/> put the code you copied from facebook developer page.
  • Click on preview and make sure that everything is fine before saving.
  • Now click on Save Template and view any post. You will find facebook like at the end of every post.
  • If you want to put the like button in the beginning of every post you need to follow the same procedure but put the second code after this line
<div class='post-body entry-content' expr:id='&quot;post-body-&quot; + data:post.id' itemprop='articleBody'> instead of <data:post.body/>.
You can use both of them as well for displaying it in the beginning and ending of your Article.

You just inserted Facebook like button in your blogger blog posts. If you face any problem, you can comment here. I will be Glad to help you. I hope this will make your blogging experience better and help you getting likes and traffic.
 If you like my work; you can show your regards by hitting Facebook like button, following us on Google+ or Twitter, stumbling our posts on stumble upon . Stay tuned for more tech updates.

If You Like My Post Please Share It. !


Read More
// // 1 comment

How to Add Facebook Slide Likebox

How to Add Facebook Slide Likebox
Add Facebook Sliding Like Box with jQUERY To blogger blog. Would be not wrong if I say you already use facebook like box for your facebook page at your website/blog. But they don’t have any kind of effect they just live at your website/blog like a simple widget. It’s about how to add a pop out facebook like box with slide effect. I found a script online that adds a floating Facebook button to right side of your blogs or websites. The button upon clicking slides towards left revealing a Facebook Like Box. It is an excellent coded slider that Hides the Likebox inside a container and reveals it only when visitors hovers the cursor on the floating button.

Add Like Box To Blogger Blog

1. Go To your Blogger Dashboard>>Template>> Edit HTML
2. and click on HTML Code then press CTRL+F and Find the Following code.
</head>

3. and paste the following jquery link before </head>
<script src="https://ajax.googleapis.com/ajax/libs/jquery/1.8.2/jquery.min.js"></script>
4. Find the following code.
</body>
5. and paste the following code before/above </body>

<style type='text/css'>/*<![CDATA[*/#fbplikebox{display: block;padding: 0;z-index: 99999;position: fixed;}.fbplbadge {background-color:#3B5998;display: block;height: 150px;top: 50%;margin-top: -75px;position: absolute;left: -47px;width: 47px;background-image: url('https://blogger.googleusercontent.com/img/b/R29vZ2xl/AVvXsEjOMFgjuoPqbj6-qi9hR4Dl5np6Ghgw2UqmYzSzYizkDcDii0_QHx5SjAhbEe9CB2KCfvp2COlnEaDQW-6z4kMsuLStYpYj09tyKlkUW7DsMOvfLb4JNJD7WFulfYYu5h0SOVjMVclGWI_6/s1600/w2b_vertical-right.png');background-repeat: no-repeat;overflow: hidden;-webkit-border-top-left-radius: 8px;-webkit-border-bottom-left-radius: 8px;-moz-border-radius-topleft: 8px;-moz-border-radius-bottomleft: 8px;border-top-left-radius: 8px;border-bottom-left-radius: 8px;}/*]]>*/</style><script type='text/javascript'>/*<![CDATA[*/(function(w2b){
        w2b(document).ready(function(){
            var $dur = 'medium'; // Duration of Animation
            w2b('#fbplikebox').css({right: -250, 'top' : 350 })
            w2b('#fbplikebox').hover(function () {
                w2b(this).stop().animate({
                    right: 0
                }, $dur);
            }, function () {
                w2b(this).stop().animate({
                    right: -250
                }, $dur);
            });
            w2b('#fbplikebox').show();
        });
    })(jQuery);/*]]>*/</script><div id='fbplikebox' style='display:none;'> <div class='fbplbadge'></div> <iframe src='http://www.facebook.com/plugins/likebox.php?href=http%3A%2F%2Ffacebook.com%2FInfoBlogMaz&amp;width=250&amp;height=260&amp;colorscheme=light&amp;show_faces=true&amp;border_color=%23C4C4C4&amp;stream=false&amp;header=false' scrolling='no' frameborder='0' style='border:none; overflow:hidden; width:250px; height:260px;background:#FFFFFF;' allowtransparency='true'></iframe></div> 

http://www.facebook.com/plugins/likebox.php?href=http%3A%2F%2Ffacebook.com%2FInfoBlogMaz&amp

6. Replace “InfoBlogMaz” with you facebook page user name highlighted above in blue.
7. Click on save button and take your blog new look.

Visit your Blogs to see it floating at the right side of your webpage. If you wish to change the direction, width, height, background. of the Likebox or make the image changes then do let me know.

If You Like My Post Please Share It. !
Read More
// // Leave a Comment

How to Embed Google+ Posts in Blogger


How to Embed Google+ Posts in Blogger

Source mybloggerlab.com

Google+ introduced quite a few new features on Monday, including a new tool that allows webmasters and bloggers to embed Google+ public posts on their blogs, websites, web forums and whatever place they like. Users who like to embed top posts from Google+ or on a personal blog or news portal can do that by clicking the "Embed Posts" tab located on the top right drop down menu of the post. It makes it a lot easier for a webmaster to include authentic information by embedding some high quality Google+ posts straight into his blog. Today in this article, we will show you How to Embed Google+ Posts in Blogger.

Once a post is embedded in another, it would certainly be fully interactive as mentioned in the Google+ Official blog posts, which means that users can +1 a post, comment of follow the author directly from their place where it is embedded.

"We want to make it easy to expand your audience across the web," wrote Seth Sternberg, Director of Google+ Platform. According to them, this feature was tested on some top quality publication platforms like Sports Illustrated and National Geographic, but it is now available to all users.

 How to Embed Google+ Posts in Blogger: 

The first thing you need to do is to go to plus.google.com and login into your Google+ account. After logging in, look for the post that you would like to embed on your blog. It does not matter that the posts you are choosing is yours or not as long as it is a public posts you can embed it on your blog.


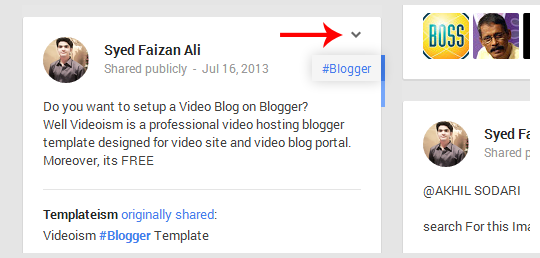
After selecting a post, you will able to see an “arrow” indicating downwards located on the top right corner. On pressing that “arrow” a drop menu will appear consisting on an option called “Embed posts”, just select it and proceed to the next step.

Users can then copy and paste the available line of code to embed the posts. Blogger users can go to Blogger.com >> Add a new post >> HTML Tab and can paste the copied code in the HTML text editor. Once everything is done, publish the post by pressing “Publish” button.


Congratulations: 

You have successfully embedded Google+ posts in Blogger. Now go and checkout your site to see if things are working as planned or not.

We hope this tutorial may have helped you in learning How to Add Google+ Embed posts in Blogger. Social platforms are turning and making it a lot easier for people to use and spread the awareness across the website. Both Facebook and Google have embedded post features which may provide a lot of benefits. What do you think about Google+ embedded posts?


Read More
// // 19 comments

How To Add Social Media Share Button Below Post In Blogspot

Adding share button on your blog post will increase page views and readership. There are several style of placement you can use. My favorite is adding them under blog post. Those colorful button are fast and easy to search. For this gadget, I usually use Share This service. You don't have to add all of them. Just pick social media that you use the most or focus on.

If you like the social media button that I added under every blog post, I'll give you the code, just follow this easy blogspot tutorial for beginner:

1. Go to your blogger/blogspot LayOut, and click on Add Gadget.
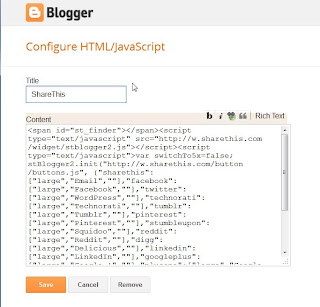
2. Choose HTML/JavaScript gadget. Copy - paste code below on the gadget box:


<span id="st_finder"></span><script type="text/javascript" src="http://w.sharethis.com/widget/stblogger2.js"></script><script type="text/javascript">var switchTo5x=false;stBlogger2.init("http://w.sharethis.com/button/buttons.js", {"sharethis":["large","Email",""],"facebook":["large","Facebook",""],"twitter":["large","WordPress",""],"technorati":["large","Technorati",""],"tumblr":["large","Tumblr",""],"pinterest":["large","Pinterest",""],"stumbleupon":["large","Squidoo",""],"reddit":["large","Reddit",""],"digg":["large","Delicious",""],"linkedin":["large","LinkedIn",""],"googleplus":["large","Google +",""],"plusone":["large","Google +1",""],"fblike":["large","Facebook Like",""]} , "bl-6f6f3ce4-f6b6-7692-9d8d-55623b908a29");var f =document.getElementById("st_finder");var c = f.parentNode.parentNode.childNodes;for (i=0;i<c.length;i++) {try { c[i].style.display = "none"; } catch (err) {}}</script>


3. Now place the gadget wherever you want. The gadget always appear on the bottom of blog post, doesn't matter where you place them. But, don't place them between gadgets on sidebar, cos when people visit your page, there will be blank space. I usually adding them below blog post gadget or on the bottom of sidebar gadgets.

4. View Blog. Now you have it.

Now, just in case you don't like my social media selection, and want to add them yourselves, follow the steps below:
Blogspot Tutorial: Adding Share This Social Button:

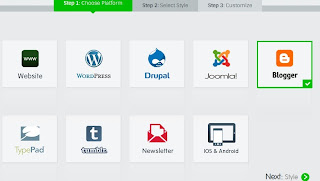
1. Go To Share This Platform


2. Click Next to Select Style.


3. Click Next to Customize.


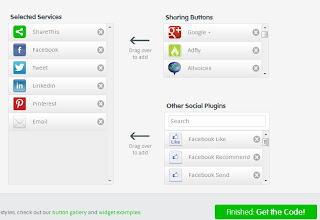
Every time you pick your button on right sidebar, it will added automatically on left bar. When you finish, click Get the Code button. The register box will show up, just click x (no thanks, just give me a code) on the right bottom. Copy-paste the code to HTML/Javascript gadget box.

4. View Blog.


If You Like My Post Please Share This


Read More